
How to paint a Watercolour Galaxy Sky?
So, you wanna learn how to paint a Watercolour Galaxy Sky! You came to the right place... but before we get started on our watercolour galaxy sky, let's talk about the materials you need to get started.
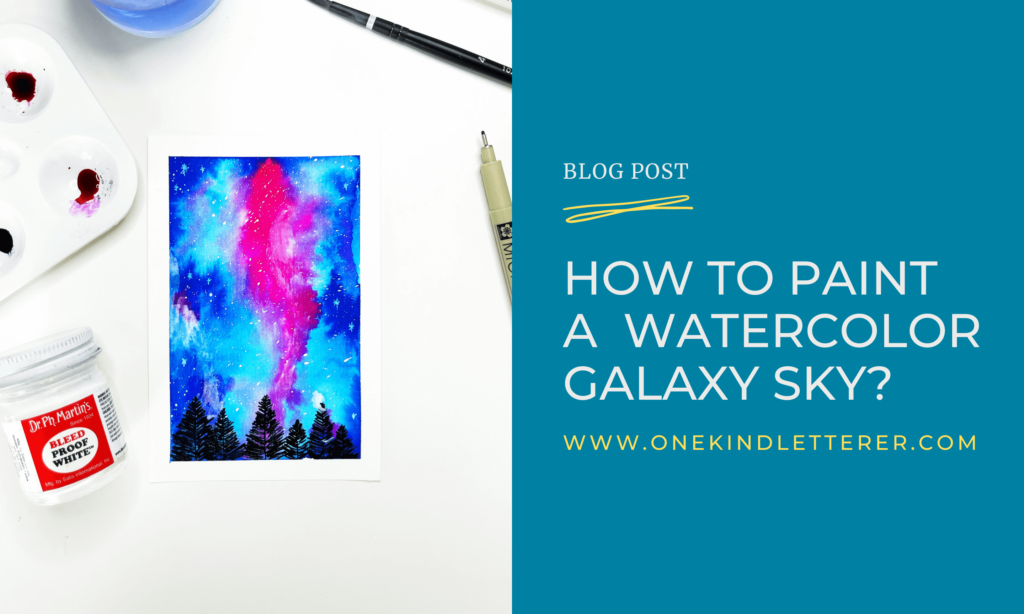
Recommended Tools:
- Ph Martin Radiant Concentrated Watercolour (I used 9A True Blue and 7A Moss Rose)
- Bleed Proof White
- Washi Tape
- Cold Press Watercolour Paper (I used A6 size))
- Paintbrush (I used round, size 4)
- Toothbrush
- Paper Towel
- Sakura White Gelly Roll 08
- Sakura Pigma Micron 05
- 2 cups of water (1 for washing the used brushes)
Now that you have all the materials, let's get started with our step-by-step tutorial on how to paint a watercolour galaxy sky.
Let's get started!
1. Tape your Cold Press Watercolour Paper to the table with washi tape. Next, use your paintbrush to wet the Watercolour Paper.

2. Now, add in the Blue Watercolour by dabbing the paint at the sides of the watercolour paper. The paint will flow naturally with the water and you will see the lines of the watercolour paper. Keep the centre of the paper empty so we can add in the pink later on.

3. Wash your paintbrush first and dab it on the paper towel. Next, let's add the pink into the empty white spaces, starting from the centre. You want the pink to flow out.. towards the blue. But at the same time, you want to leave some white spaces between the blue and pink to create a "milky way".

4. The last step with the watercolours would be to try and mix abit of the blue and pink together. I would use a clean brush to pick out some pink from the paper and dab onto the blue on certain spots of the paper. You can also add water to the white portions of the paper.

5. Before starting on this step, make sure that the watercolours is completely dry. Once the paper is completely dry, we will add Bleed Proof White onto the Galaxy Sky to create random stars in our piece. I usually put some Bleed Proof White onto my palette and add a drop of water. I dip a toothbrush into the Bleed Proof White and "spray" it onto the paper by rubbing my finger against the bristles of the toothbrush.

6. After the bleed proof white has dried, use the Sakura White Gelly Roll to draw in stars on the darker shades of the piece.

7. Lastly, you can add in trees using the Sakura Pigma Micron Pen (05).

And there you have it, step by step tutorial on how to paint a watercolour galaxy sky. Do check out my blog for more tutorials.
If you like this tutorial, join me inside my FB Group, Lettering Club where I offer monthly tutorials via FB Live every month.

Introduction to Brush Lettering Mini-Course
Not sure if Brush Lettering is for you? Sign up now for a FREE 4 day email course to find out all about brush lettering. You will learn about the basics of lettering, what tools you need and how to get started!